Working with Tables
Data တွေကို rows တွေ columns တွေနဲ့ ဖော်ပြချင်သလား ? အခု အခန်းမှာတော့ HTML table ကို အသုံးချနည်း ဖော်ပြပေးပါမယ်။ Table ကို ဖန်တီးတဲ့ အခါမှာ <table> tag ကို အသုံးပြုရပါတယ်။ <tr> tag ကတော့ row ကို ဖန်တီးပါတယ်။ <tr> tgas ကတော့ row ထဲက data cell တွေ ဖန်တီးဖို့ အတွက်ပါ။ Table မှာ color , background images စတာတွေ ထည့်သွင်းလို့ရပါတယ်။ Table ကို အသုံးပြုပြီးတော့ website ရဲ့ layout ကို လည်း ဖန်တီးအသုံးပြုနိုင်ပါတယ်။
Understanding Table Structure
HTML tables တွေဟာ data တွေ အများကြီးကို rows နဲ့ columns နဲ့ ပြတဲ့ အခါမှာ အသုံးပြုပါတယ်။ Table ထဲမှာ number တွေ သာမက စာတွေ ၊ ပုံတွေ ၊ multimedia တွေ ပါ ပါဝင်နိုင်ပါတယ်။ ဥပမာ ။။ သင့် အနေနဲ့ table ကို company ရဲ့ အရောင်း ရလဒ် ကို ဖော်ပြဖို့အတွက် grid ထဲမှာ ပုံတွေ နောက်ပြီးတော့ data တွေ CSS ကို အသုံးပြုပြီးတော့ border , alignment , size စတာတွေ နဲ့ ဖန်တီးနိုင်ပါတယ်။
| Table Column 1 | Table Column 2 |
|---|---|
| Cell | Cell |
Add a Table
Table ကို ထည့်ဖို့ အတွက် <table> tag ကို အရင် ထည့်ရပါတယ်။ ပြီးတဲ့ အခါမှာတော့ ကျွန်တော်တို့တွေ <tr> tag နဲ့ row ကို ဖန်တီးပါတယ်။ row ထဲမှာ cell အရေအတွက် အတွက်ကတော့ <td> ကို ဖန်တီးရပါတယ်။
<!DOCTYPE html>
<html>
<head>
    <meta charset="UTF-8">
    <title>Table</title>
</head>
<body>
    <table>
        <!-- Row 1 -->
        <tr>
            <td>Cell 1</td>
            <td>Cell 2</td>
        </tr>
        <!-- Row 2 -->
        <tr>
            <td>Cell 1</td>
            <td>Cell 2</td>
        </tr>
    </table>
</body>
</html>
အထက်ပါ code ကို browser မှာ ဆိုရင် အောက်ကလို မြင်ရပါလိမ့်မယ်။

Figure 7-1. Sample Table
ကျွန်တော်တို့ နောက်ထပ် table တစ်ခု ဖန်တီးကြည့်ရအောင် ။ လက်ရှိ table နေရာမှာ အောက်က table အစားထိုးလိုက်ပါမယ်။
<table>
    <tr>
        <th>Company</th>
        <th>Product</th>
    </tr>
    <tr>
        <td>Apple</td>
        <td>Tablet , Phone , Computer</td>
    </tr>
    <tr>
        <td>Google</td>
        <td>Search Engine , Chrome Browser , Android</td>
    </tr>
    <tr>
        <td>Microsoft</td>
        <td>Operating system, Software</td>
    </tr>
</table>
အဲဒါလေးကို browser မှာ ဆိုရင် ဒီလိုလေး မြင်ရပါမယ်။
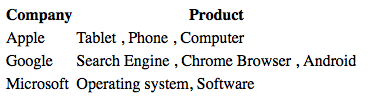
Figure 7-2. Table
<th> ဆိုတာကတော့ header အတွက် အသုံးပြုတာပါ။ Bold ဖြစ်ပြီးတော့ text ကို center ပို့ ထားတာ ကိုတွေ့နိုင်ပါတယ်။
Add Table Borders
ပုံမှန် အားဖြင့် table မှာ ဘောင်တွေ မပါဝင်ပါဘူး။ table ကို ဘောင်တွေ ထည့်ဖို့ အတွက် border ကို အသုံးပြုရပါမယ်။ ဘောင်ထူထူလိုချင်ရင်တော့ border-width ရဲ့ တန်ဖိုးကို ပြောင်းပေးဖို့ လိုပါတယ်။ အရင်ဆုံး table ကို border ထည့်ကြည့်ရအောင်။
<!DOCTYPE html>
<html>
<head>
    <meta charset="UTF-8">
    <title>Table</title>
    <style>
    table { border : 1px solid red;}
    </style>
</head>
<body>
<table>
    <tr>
        <th>Company</th>
        <th>Product</th>
    </tr>
    <tr>
        <td>Apple</td>
        <td>Tablet , Phone , Computer</td>
    </tr>
    <tr>
        <td>Google</td>
        <td>Search Engine , Chrome Browser , Android</td>
    </tr>
    <tr>
        <td>Microsoft</td>
        <td>Operating system, Software</td>
    </tr>
</table>
</body>
</html>
table ကို border အနီရောင် ထည့်ထားတဲ့ အတွက် table တစ်ခု တည်း ဘောင် အနီရောင်နဲ့ မြင်ရပါမယ်။
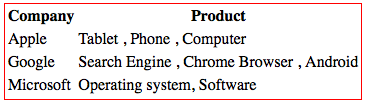
Figure 7-3.
ထပ်ပြီးတော့ th နဲ့ td မှာ border ထည့်ကြည့်ရအောင်။
<!DOCTYPE html>
<html>
<head>
    <meta charset="UTF-8">
    <title>Table</title>
    <style>
    table { border : 3px solid red;}
    th { border: 2px solid green;}
    td { border: 2px solid blue;}
    </style>
</head>
<body>
<table>
    <tr>
        <th>Company</th>
        <th>Product</th>
    </tr>
    <tr>
        <td>Apple</td>
        <td>Tablet , Phone , Computer</td>
    </tr>
    <tr>
        <td>Google</td>
        <td>Search Engine , Chrome Browser , Android</td>
    </tr>
    <tr>
        <td>Microsoft</td>
        <td>Operating system, Software</td>
    </tr>
</table>
</body>
</html>
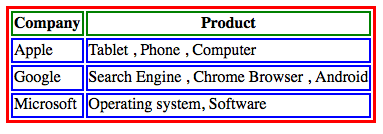
Figure 7-4
Adjust Cell Padding and Border Spacing
Cell တစ်ခု နဲ့ တစ်ခုကြားမှာ space လေးတွေ ကွာနေတာလေးတွေကို တွေ့မှာပါ။ အဲဒါက border-spacing ပါ။ cell က စာနဲ့ ဘောင် ကပ်နေတာကတော့ padding ကြောင့်ပါ။
ကျွန်တော်တို့တွေ td မှာ padding ထည့်ကြည့်ရအောင်။
<!DOCTYPE html>
<html>
<head>
    <meta charset="UTF-8">
    <title>Table</title>
    <style>
    table { border : 3px solid red;}
    th { border: 2px solid green;}
    td { border: 2px solid blue; padding:30px;}
    </style>
</head>
<body>
<table>
    <tr>
        <th>Company</th>
        <th>Product</th>
    </tr>
    <tr>
        <td>Apple</td>
        <td>Tablet , Phone , Computer</td>
    </tr>
    <tr>
        <td>Google</td>
        <td>Search Engine , Chrome Browser , Android</td>
    </tr>
    <tr>
        <td>Microsoft</td>
        <td>Operating system, Software</td>
    </tr>
</table>
</body>
</html>
td မှာ padding 30px ထည့်လိုက်တာကြောင့် cell အထဲက စာနဲ့ border 30px ကွာသွားတာကို တွေ့ရမှာပါ။
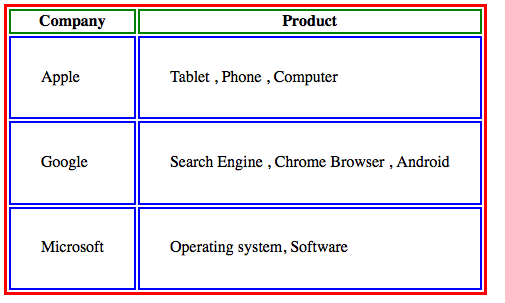
Figure 7-5.
အခု table ရဲ့ border-spacing ကို ပြောင်းကြည့်ရအောင်။
<!DOCTYPE html>
<html>
<head>
    <meta charset="UTF-8">
    <title>Table</title>
    <style>
    table { border : 3px solid red; border-spacing:20px;}
    th { border: 2px solid green;}
    td { border: 2px solid blue; padding:30px;}
    </style>
</head>
<body>
<table>
    <tr>
        <th>Company</th>
        <th>Product</th>
    </tr>
    <tr>
        <td>Apple</td>
        <td>Tablet , Phone , Computer</td>
    </tr>
    <tr>
        <td>Google</td>
        <td>Search Engine , Chrome Browser , Android</td>
    </tr>
    <tr>
        <td>Microsoft</td>
        <td>Operating system, Software</td>
    </tr>
</table>
</body>
</html>
table မှာ border-spacing:20px; ထည့်လိုက်ပါတယ်။ အဲဒါကြောင့် cell ရဲ့ spacing တွေ ကွာသွားတာကို တွေ့နိုင်ပါတယ်။
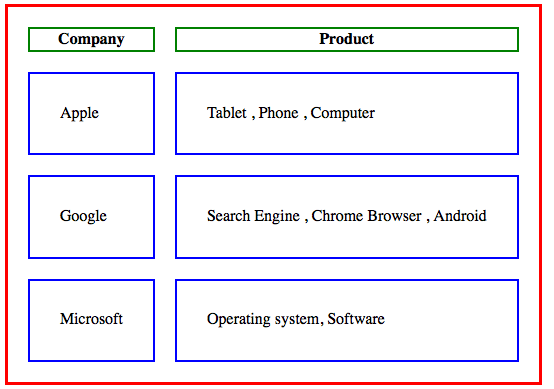
Figure 7-6.
Adjust Cell Width and Height
Table မှာ cell ရဲ့ width နဲ့ height ကို လိုအပ်သလို ချိန်ညှိနိုင်ပါတယ်။ အဲဒီ အတွက် CSS က width နှင့် height ကို အသုံးပြုဖို့လိုပါတယ်။
<!DOCTYPE html>
<html>
<head>
    <meta charset="UTF-8">
    <title>Table</title>
    <style>
    table { border : 3px solid red;}
    th { border: 2px solid green;height:100px;}
    td { border: 2px solid blue; width:100px;}
    </style>
</head>
<body>
<table>
    <tr>
        <th>Company</th>
        <th>Product</th>
    </tr>
    <tr>
        <td>Apple</td>
        <td>Tablet , Phone , Computer</td>
    </tr>
    <tr>
        <td>Google</td>
        <td>Search Engine , Chrome Browser , Android</td>
    </tr>
    <tr>
        <td>Microsoft</td>
        <td>Operating system, Software</td>
    </tr>
</table>
</body>
</html>
အဲဒီ code ဟာ browser မှာ ဆိုရင် အောက်က ပုံလို မြင်ရပါမယ်။
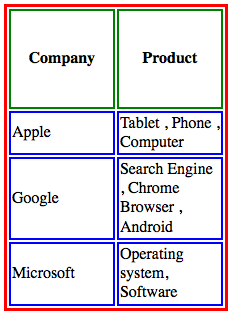
Figure 7-7.
Cell ရဲ့ width ဟာ 100px ဖြစ်နေတာကို တွေ့ပါလိမ့်မယ်။ နောက်ပြီးတော့ th ရဲ့ height ဟာ 100px ဖြစ်တာကြောင့် ကြီးနေတာကို တွေ့ရပါလိမ့်မယ်။
အကယ်၍ ကျွန်တော်တို့တွေက cell တွေ အကုန် မပြင်ချင်ပဲ အချို့ကိုတာ ပြင်လိုရင်တော့ class သို့မဟုတ် id နဲ့ တွဲ သုံးဖို့လိုပါတယ်။
td.custom { height:80px }
html က td မှာ
<td class="custom">My Data</td>
ဆိုပြီး အသုံးပြုနိုင်ပါတယ်။
Add a Caption to a Table
Table မှာ caption ထည့်ဖို့ အတွက် <caption> tag ကို <table> tag အတွင်းထဲမှာ ထည့်ပြီးတော့ အသုံးပြုနိုင်ပါတယ်။
<!DOCTYPE html>
<html>
<head>
    <meta charset="UTF-8">
    <title>Table</title>
    <style>
    table { border : 3px solid red;}
    th { border: 2px solid green;height:100px;}
    td { border: 2px solid blue; width:100px;}
    </style>
</head>
<body>
<table>
    <caption>Technology Companies</caption>
    <tr>
        <th>Company</th>
        <th>Product</th>
    </tr>
    <tr>
        <td>Apple</td>
        <td>Tablet , Phone , Computer</td>
    </tr>
    <tr>
        <td>Google</td>
        <td>Search Engine , Chrome Browser , Android</td>
    </tr>
    <tr>
        <td>Microsoft</td>
        <td>Operating system, Software</td>
    </tr>
</table>
</body>
</html>
Browser မှာ ဆိုရင် အောက်ပါ ပုံအတိုင်း မြင်ရပါလိမ့်မယ်။
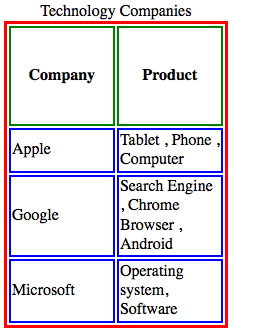
Figure 7-8.
Add a Background Color to Cells
ကျွန်တော်တို့ cell ရဲ့ background color ကို ထည့်မယ်ဆိုရင်တော့ အရင်တုန်းက သုံးခဲ့တဲ့ background-color ကိုပဲ ပြန်ပြီး အသုံးပြုရပါမယ်။
<!DOCTYPE html>
<html>
<head>
    <meta charset="UTF-8">
    <title>Table</title>
    <style>
    table {border : 3px solid red;}
    th {border: 2px solid green;height:100px;}
    td {border: 2px solid blue; width:100px;}
    td.highlight {background-color :#FFFBCC;}
    </style>
</head>
<body>
<table>
    <caption>Technology Companies</caption>
    <tr>
        <th>Company</th>
        <th>Product</th>
    </tr>
    <tr>
        <td class='highlight'>Apple</td>
        <td>Tablet , Phone , Computer</td>
    </tr>
    <tr>
        <td>Google</td>
        <td>Search Engine , Chrome Browser , Android</td>
    </tr>
    <tr>
        <td>Microsoft</td>
        <td>Operating system, Software</td>
    </tr>
</table>
</body>
</html>
အဲဒီ code မှာ Apple ရဲ့ td ကို highlight class သုံးထားပြီးတော့ css မှာ
td.highlight {background-color :#FFFBCC;}
လို့ ရေးထားတာ တွေ့နိုင်ပါတယ်။
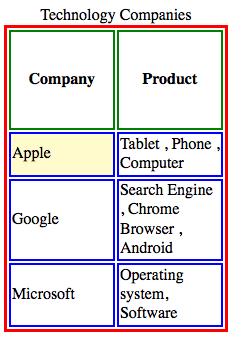
Figure 7-9.
Add a Background Color to a Table
Table တစ်ခု လုံးကို background color ထည့်လိုရင်တော့ CSS မှာ table အတွက် background-color ကို အသုံးပြုရပါမယ်။
<!DOCTYPE html>
<html>
<head>
    <meta charset="UTF-8">
    <title>Table</title>
    <style>
    table.pretty {border : 1px solid red;background-color :#FFFBCC; border-spacing:0px;}
    th {border: 1px solid gray;}
    td {border: 1px solid gray; width:200px;}
    </style>
</head>
<body>
<table class="pretty">
    <caption>Technology Companies</caption>
    <tr>
        <th>Company</th>
        <th>Product</th>
    </tr>
    <tr>
        <td>Apple</td>
        <td>Tablet , Phone , Computer</td>
    </tr>
    <tr>
        <td>Google</td>
        <td>Search Engine , Chrome Browser , Android</td>
    </tr>
    <tr>
        <td>Microsoft</td>
        <td>Operating system, Software</td>
    </tr>
</table>
</body>
</html>
အဲဒီ code မှာ table ကို class pretty ပေးထားပြီးတော့
table.pretty {border : 1px solid red;background-color :#FFFBCC; border-spacing:0px;}
လို့ ရေးထားပြီး background color ထည့်ထားတာ တွေ့နိုင်ပါတယ်။ css ကို class မသုံးပဲ table သုံးလိုက်ရင် table တွေ အားလုံးမှာ သွားပြီး အကျိုးသက်ရောက်ပါလိမ့်မယ်။ အဲဒီ code လေးက browser မှာ ဆိုရင်အောက်ကလို ပေါ်ပါလိမ့်မယ်။
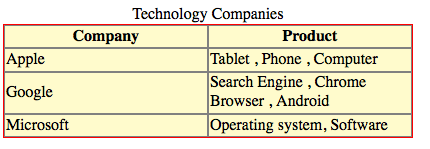
Figure 7-10.
Adjust the Table Size
သင့်အနေနဲ့ table အရွယ်အစားကို စိတ်ကြိုက်ပြင်လို့ရပါတယ်။
<!DOCTYPE html>
<html>
<head>
    <meta charset="UTF-8">
    <title>Table</title>
    <style>
    table.pretty {border : 1px solid red;background-color :#FFFBCC; border-spacing:0px;width:100%;}
    th {border: 1px solid gray;}
    th.small {width:200px;}
    td {border: 1px solid gray;}
    </style>
</head>
<body>
<table class="pretty">
    <caption>Technology Companies</caption>
    <tr>
        <th class='small'>Company</th>
        <th>Product</th>
    </tr>
    <tr>
        <td>Apple</td>
        <td>Tablet , Phone , Computer</td>
    </tr>
    <tr>
        <td>Google</td>
        <td>Search Engine , Chrome Browser , Android</td>
    </tr>
    <tr>
        <td>Microsoft</td>
        <td>Operating system, Software</td>
    </tr>
</table>
</body>
</html>
ကျွန်တော်တို့ table ရဲ့ width ကို 100% ပေးထားလိုက်ပါပြီ။ ဒါကြောင့် table ရဲ့ အကျယ် ဟာ browser အပြည့် မြင်ရပါမယ်။

Figure 7-11
အခု လက်ရှိ table မှာပဲ ကျွန်တော်တို့ ထပ်ပြီးတော့ height ကို 500px ထည့်ကြည့်ရအောင်။
<!DOCTYPE html>
<html>
<head>
    <meta charset="UTF-8">
    <title>Table</title>
    <style>
    table.pretty {
        border : 1px solid red;
        background-color :#FFFBCC;
        border-spacing:0px;width:100%;
        height:500px;
    }
    th {border: 1px solid gray;}
    th.small {width:200px;}
    td {border: 1px solid gray;}
    </style>
</head>
<body>
<table class="pretty">
    <caption>Technology Companies</caption>
    <tr>
        <th class='small'>Company</th>
        <th>Product</th>
    </tr>
    <tr>
        <td>Apple</td>
        <td>Tablet , Phone , Computer</td>
    </tr>
    <tr>
        <td>Google</td>
        <td>Search Engine , Chrome Browser , Android</td>
    </tr>
    <tr>
        <td>Microsoft</td>
        <td>Operating system, Software</td>
    </tr>
</table>
</body>
</html>
အဲဒီ အခါ table ရဲ့ အရွယ်အစားကြီးသွားပြီး cell height တွေပါ ကျယ်သွားတာကို တွေ့နိုင်ပါတယ်။
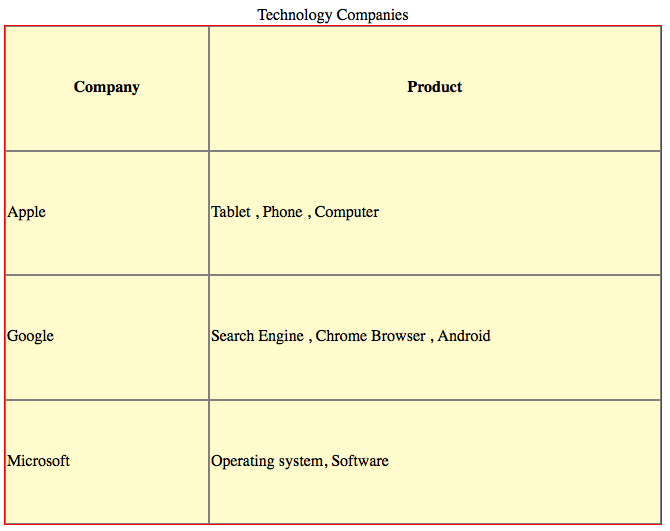
Figure 7-12
Change Table Alignment
ကျွန်တော်တို့တွေ table ကို စာတွေ နဲ့ တွဲပြီး ဖော်ပြတဲ့ အခါမှာတော့ Table ကို align ပြန်လုပ်ဖို့ လိုပါတယ်။
ပထမဆုံး tablet ကို ညာဘက် ကပ်ကြည့်ရအောင်။
<!DOCTYPE html>
<html>
<head>
    <meta charset="UTF-8">
    <title>Table</title>
    <style>
    table.pretty {
        border : 1px solid red;
        background-color :#FFFBCC;
        border-spacing:0px;width:300px;
        float:right;
    }
    th {border: 1px solid gray; text-align:right;}
    th.small {width:200px;}
    td {border: 1px solid gray;}
    td.align-bottom {vertical-align:bottom;}
    </style>
</head>
<body>
<table class="pretty">
    <caption>Technology Companies</caption>
    <tr>
        <th class='small'>Company</th>
        <th>Product</th>
    </tr>
    <tr>
        <td>Apple</td>
        <td>Tablet , Phone , Computer</td>
    </tr>
    <tr>
        <td>Google</td>
        <td>Search Engine , Chrome Browser , Android</td>
    </tr>
    <tr>
        <td class="align-bottom">Microsoft</td>
        <td>Operating system, Software</td>
    </tr>
</table>
    <p>Lorem Ipsum is simply dummy text of the printing and typesetting industry. Lorem Ipsum has been the industry's standard dummy text ever since the 1500s, when an unknown printer took a galley of type and scrambled it to make a type specimen book. It has survived not only five centuries, but also the leap into electronic typesetting, remaining essentially unchanged. It was popularised in the 1960s with the release of Letraset sheets containing Lorem Ipsum passages, and more recently with desktop publishing software like Aldus PageMaker including versions of Lorem Ipsum.</p>
</body>
</html>
အဲဒီ code မှာ table ကို ညာဘက် ကပ်ထားတာ တွေ့ရပါလိမ့်မယ်။
table.pretty {
        float:right;
    }
ဆိုတဲ့ သဘောက table တစ်ခုလုံးကို ညာ ဘက် ရွှေ့လိုက်တဲ့ သဘောပါ။
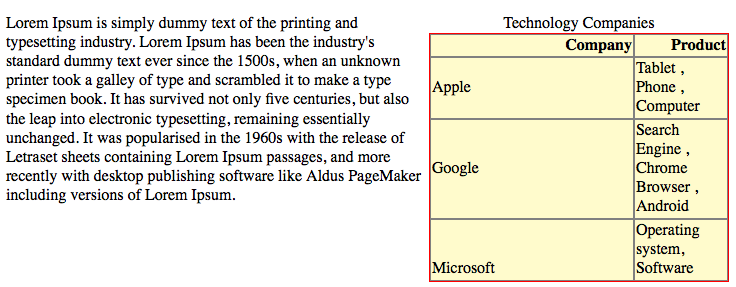
Figure 7-14.
တကယ်လို့ website ရဲ့ အလယ်မှာ ထားစေချင်ရင်တော့
<!DOCTYPE html>
<html>
<head>
    <meta charset="UTF-8">
    <title>Table</title>
    <style>
    table.pretty {
        border : 1px solid red;
        background-color :#FFFBCC;
        border-spacing:0px;width:300px;
        margin-left:auto;
        margin-right:auto;
    }
    th {border: 1px solid gray; text-align:right;}
    th.small {width:200px;}
    td {border: 1px solid gray;}
    td.align-bottom {vertical-align:bottom;}
    </style>
</head>
<body>
<table class="pretty">
    <caption>Technology Companies</caption>
    <tr>
        <th class='small'>Company</th>
        <th>Product</th>
    </tr>
    <tr>
        <td>Apple</td>
        <td>Tablet , Phone , Computer</td>
    </tr>
    <tr>
        <td>Google</td>
        <td>Search Engine , Chrome Browser , Android</td>
    </tr>
    <tr>
        <td class="align-bottom">Microsoft</td>
        <td>Operating system, Software</td>
    </tr>
</table>
    <p>Lorem Ipsum is simply dummy text of the printing and typesetting industry. Lorem Ipsum has been the industry's standard dummy text ever since the 1500s, when an unknown printer took a galley of type and scrambled it to make a type specimen book. It has survived not only five centuries, but also the leap into electronic typesetting, remaining essentially unchanged. It was popularised in the 1960s with the release of Letraset sheets containing Lorem Ipsum passages, and more recently with desktop publishing software like Aldus PageMaker including versions of Lorem Ipsum.</p>
</body>
</html>
အဲဒီ code မှာ float:right မသုံးတော့ပဲ margin ပြောင်းလိုက်ပါတယ်။
margin-left:auto;
margin-right:auto;
margin-left ကော margin-right ကော auto ပေးလိုက်တာကြောင့် table က အလယ်ကို ရွှေ့သွားတာ တွေ့နိုင်ပါတယ်။
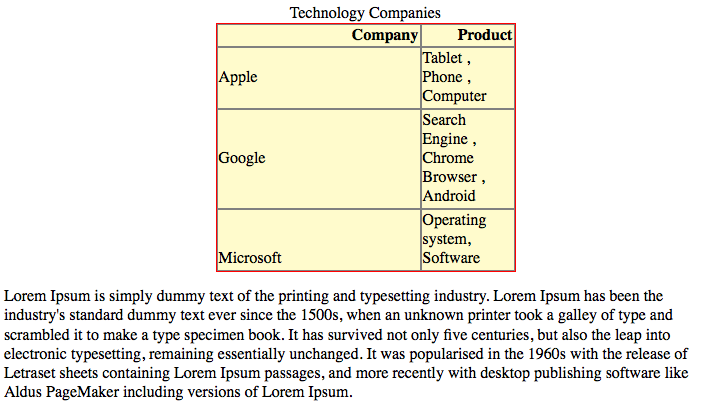
Figure 7-15.
Extend Cells Across Columns and Rows
တစ်ခါတစ်လေ ကျွန်တော်တို့ တွေ row ၂ ခု ဒါမှ မဟုတ် columns ၂ ခု စတာတွေကို ပြောင်းဖို့ လိုတာတွေ ရှိပါတယ်။ အဲဒီ အခါ colspan နဲ့ rowspan attribute ကို <td> tags နဲ့ တွဲ သုံးဖို့ လိုပါတယ်။
<!DOCTYPE html>
<html>
<head>
    <meta charset="UTF-8">
    <title>Table</title>
    <style>
    table.pretty {
        border : 1px solid red;
        background-color :#FFFBCC;
        border-spacing:0px;width:300px;
        margin-left:auto;
        margin-right:auto;
    }
    th {border: 1px solid gray;}
    th.small {width:200px;}
    td {border: 1px solid gray;}
    td.align-bottom {vertical-align:bottom;}
    </style>
</head>
<body>
<table class="pretty">
    <caption>Technology Companies</caption>
    <tr>
        <th colspan="2">Sample</th>
    </tr>
    <tr>
        <th class='small'>Company</th>
        <th>Product</th>
    </tr>
    <tr>
        <td>Apple</td>
        <td>Tablet , Phone , Computer</td>
    </tr>
    <tr>
        <td>Google</td>
        <td>Search Engine , Chrome Browser , Android</td>
    </tr>
    <tr>
        <td class="align-bottom">Microsoft</td>
        <td>Operating system, Software</td>
    </tr>
</table>
</body>
</html>
အဲဒီ code မှာ
<tr>
    <th colspan="2">Sample</th>
</tr>
ဆိုတာ columns ၂ ခု ကို ပြောင်းမယ်လို့ ဆိုထားတာပါ။ ကျွန်တော်တို့ ဆီမှာ columns ၂ ခု ရှိပါတယ်။ Company နဲ့ Product ပါ။ columns ၂ ခုကို ပြောင်းချင်တာကြောင့် colspan မှာ 2 ထည့်ထားတာပါ။ တကယ်လို့ columns ၃ ခု သာ ရှိရင်တော့ colspan = "3" ကို အသုံးပြုနိုင်ပါတယ်။
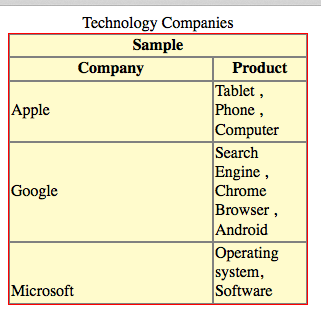
Figure 7-16.
<html>
<head>
    <title>Table</title>
    <style>
    table.pretty {
        border : 1px solid red;
        background-color :#FFFBCC;
        border-spacing:0px;width:300px;
        margin-left:auto;
        margin-right:auto;
    }
    th {border: 1px solid gray;}
    th.small {width:200px;}
    td {border: 1px solid gray;}
    td.align-bottom {vertical-align:bottom;}
    </style>
</head>
<body>
<table class="pretty">
    <caption>Technology Companies</caption>
    <tr>
        <th colspan="2">Sample</th>
    </tr>
    <tr>
        <th class='small'>Company</th>
        <th>Product</th>
    </tr>
    <tr>
        <td rowspan="3">Apple</td>
        <td>Tablet , Phone , Computer</td>
    </tr>
    <tr>
        <td>Browser</td>
    </tr>
    <tr>
        <td>Operating system, Software</td>
    </tr>
    <tr>
            <td>Google</td>
            <td>Search Engine , Chrome Browser , Android</td>
        </tr>
        <tr>
            <td class="align-bottom">Microsoft</td>
            <td>Operating system, Software</td>
        </tr>
</table>
</body>
</html>
အဲဒီ code မှာ ဆိုရင်တော့ Apple မှာ rowspan ကို ၃ လို့ သုံးထားပါတယ်။ row span သုံးထားတဲ့ အတွက် သူ့အောက်က Browser နဲ့ Operating system, Software တို့မှာ <td> တစ်ခု ပဲ ရှိတာကို တွေ့ပါလိမ့်မယ်။
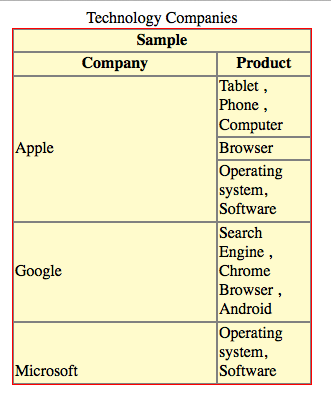
Figure 7-17.
Historical: Table-Based Page Layout
ကျွန်တော်တို့ အခု website တစ်ခုလုံးကို table ကို အသုံးပြုပြီး ရေးဆွဲကြည့်ရအောင်။ ဒီနည်းလမ်းဟာ HTML အဟောင်းတွေမှာ အသုံးများခဲ့တဲ့ historical technique ဖြစ်ပါတယ်။ Modern HTML/CSS မှာတော့ page layout အတွက် table မသုံးသင့်တော့ပါဘူး။ Tables ကို tabular data အတွက်ပဲ သုံးပြီး page layout အတွက် CSS Flexbox, CSS Grid, semantic elements (<header>, <nav>, <main>, <aside>, <footer>) တို့ကို သုံးတာ ပိုမှန်ပါတယ်။
အရင်ဆုံး ကျွန်တော်တို့ ရဲ့ page layout ကို အကြမ်းဆွဲပါမယ်။
<html>
<head>
    <title>One Piece</title>
</head>
<body>
<table>
    <tr>
        <!-- Banner -->
        <td colspan=2>
            <!-- image here -->
        </td>
    </tr>
    <tr>
        <td>
            <!-- menu -->
        </td>
        <td>
            <!-- text -->
        </td>
    </tr>
</table>
</body>
</html>
အပေါ်မှာ banner ပါပြီးတော့ ဘယ်ဘက်မှာ menu ပါပါမယ်။ ညာဘက်မှာတော့ စာတွေ ရေးပါမယ်။
banner က အပြည့်ဖြစ်မှာ ဖြစ်တဲ့ အတွက်ကြောင့် column ၂ ခု ကို ပေါင်းထားပါတယ်။ အခု စာတွေ ပုံတွေ ထည့်ကြည့်ရအောင်။
<html>
<head>
    <title>One Piece</title>
    <meta charset="utf-8">
</head>
<body>
<table>
    <tr>
        <!-- Banner -->
        <td colspan=2>
            <img src="banner.jpg">
        </td>
    </tr>
    <tr>
        <td>
            <ul>
                <li><a href="index.html">Home</a></li>
                <li><a href="gallery.html">Gallery</a></li>
                <li><a href="videos.html">Videos</a></li>
            </ul>
        </td>
        <td>
            <p>One Piece is a Japanese manga series written and illustrated by Eiichiro Oda. It has been serialized in Weekly Shōnen Jump since August 4, 1997; the individual chapters are being published in tankōbon volumes by Shueisha, with the first released on December 24, 1997, and the 73rd volume released as of March 2014. One Piece follows the adventures of Monkey D. Luffy, a young boy whose body gains the properties of rubber after unintentionally eating a Devil Fruit, and his diverse crew of pirates, named the Straw Hat Pirates. Luffy explores the ocean in search of the world's ultimate treasure known as One Piece in order to become the next Pirate King.</p>

            <p>The chapters have been adapted into an original video animation (OVA) produced by Production I.G in 1998, and an anime series produced by Toei Animation, which began broadcasting in Japan in 1999. Since then, the still ongoing series has aired over 600 episodes. Additionally, Toei has developed eleven animated feature films, two OVA's, and five television specials. Several companies have developed various types of merchandising such as a trading card game, and a large number of video games.</p>

            <p>The manga series was licensed for an English language release in North America by Viz Media, in the United Kingdom by Gollancz Manga, and in Australia and New Zealand by Madman Entertainment. The anime series has been licensed by Funimation Entertainment for an English-language release in North America, although the series was originally licensed and distributed by 4Kids Entertainment.</p>

            <p>One Piece has received wide critical acclaim, primarily for its art, characterization, humor and story. Several volumes of the manga have broken publishing records, including highest initial print run of any book in Japan and the first book to sell over three million copies in Oricon history. As of 2013, the series had over 345 million volumes in circulation worldwide, making it the best-selling manga series in history.</p>

        </td>
    </tr>
</table>
</body>
</html>
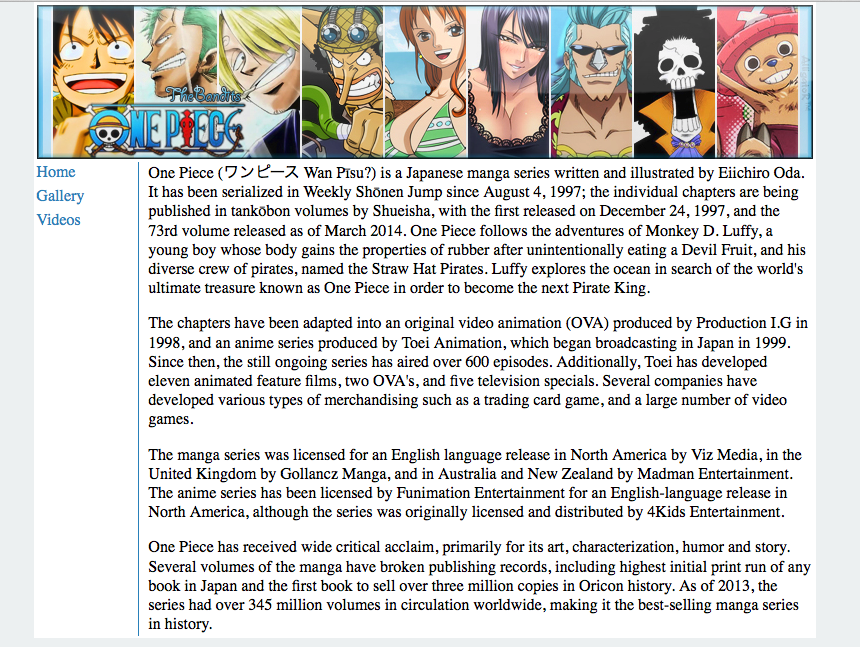
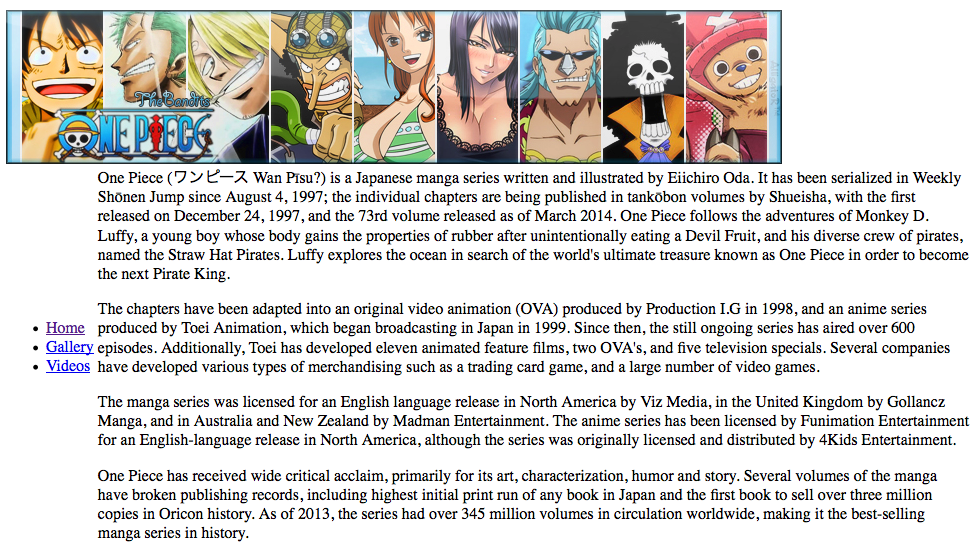
အဲဒီ အခါ browser မှာ အောက်ကလို မျိုး မြင်ရပါမယ်။
အခု ထပ်ပြီးတော့ ကျွန်တော်တို့ တွေ css ထည့်ရအောင်။
<html>
<head>
    <title>One Piece</title>
    <meta charset="utf-8">
    <style>
    body {
        padding:0px;
        margin:0px;
        background-color:#ecf0f1;
    }
    table.container {
        width:776px;
        margin-left:auto;
        margin-right:auto;
        background-color:#FFFFFF;
    }
    td.banner {
        text-align:center;
    }
    td.menu {
        width: 100px;
        vertical-align:top;
        border-right: 1px solid #2980b9;
    }

    td.menu ul {
        list-style:none;
        padding:0px;
    }

    td.menu ul li {
        padding-bottom:5px;
    }

    td.menu ul li a {
        text-decoration: none;

    }

    td.menu ul li a:link , td.menu ul li a:visited {
        color:#2980b9;
    }

    td.menu ul li a:hover {
        color:#3498db;
        text-decoration:underline;
    }

    td.content {
        padding-left : 8px;
    }
    </style>
</head>
<body>
<table class="container">
    <tr>
        <!-- Banner -->
        <td colspan=2 class='banner'>
            <img src="banner.jpg">
        </td>
    </tr>
    <tr>
        <td class="menu">
            <ul>
                <li><a href="index.html">Home</a></li>
                <li><a href="gallery.html">Gallery</a></li>
                <li><a href="videos.html">Videos</a></li>
            </ul>
        </td>
        <td class="content">
            <p>One Piece is a Japanese manga series written and illustrated by Eiichiro Oda. It has been serialized in Weekly Shōnen Jump since August 4, 1997; the individual chapters are being published in tankōbon volumes by Shueisha, with the first released on December 24, 1997, and the 73rd volume released as of March 2014. One Piece follows the adventures of Monkey D. Luffy, a young boy whose body gains the properties of rubber after unintentionally eating a Devil Fruit, and his diverse crew of pirates, named the Straw Hat Pirates. Luffy explores the ocean in search of the world's ultimate treasure known as One Piece in order to become the next Pirate King.</p>

            <p>The chapters have been adapted into an original video animation (OVA) produced by Production I.G in 1998, and an anime series produced by Toei Animation, which began broadcasting in Japan in 1999. Since then, the still ongoing series has aired over 600 episodes. Additionally, Toei has developed eleven animated feature films, two OVA's, and five television specials. Several companies have developed various types of merchandising such as a trading card game, and a large number of video games.</p>

            <p>The manga series was licensed for an English language release in North America by Viz Media, in the United Kingdom by Gollancz Manga, and in Australia and New Zealand by Madman Entertainment. The anime series has been licensed by Funimation Entertainment for an English-language release in North America, although the series was originally licensed and distributed by 4Kids Entertainment.</p>

            <p>One Piece has received wide critical acclaim, primarily for its art, characterization, humor and story. Several volumes of the manga have broken publishing records, including highest initial print run of any book in Japan and the first book to sell over three million copies in Oricon history. As of 2013, the series had over 345 million volumes in circulation worldwide, making it the best-selling manga series in history.</p>

        </td>
    </tr>
</table>
</body>
</html>
အခု ဆိုရင် ကျွန်တော်တို့ တွေ CSS တွေ ထပ်ဖြည့်ထားပါတယ်။ ဒါကြောင့် website က အောက်ကလို မြင်ရပါလိမ့်မယ်။ သို့ပေမယ့် production website အသစ်ရေးမယ်ဆိုရင် ဒီ table layout နည်းကို မသုံးဘဲ CSS Grid/Flexbox နဲ့ semantic HTML ကို သုံးပါ။